So you just joined a new server, ran around for a few minutes to explore and now you're lost in the middle of nowhere. We've all been there before. Dynmap allows you to have a Minecraft world map be displayed on any web browser in real time.
Plugin Based Installation
(Bukkit/Spigot/Paper)
1. Download the version of Dynmap you want here.
2. Open your "Plugins" folder in your server files.
3. Drop the plugin into the "Plugins" folder.
4. Restart your server.
5. Head over to the "Network" tab of your server panel
6. Click the "Create Allocation" button. This will assign a new port that will be used for Dynmap.
7. Copy the port number you were assigned. Do not use your primary port.
8. In your "Plugins" folder, a new folder should have generated called "Dynmap". Head in there and open up the "configuration.txt" file.
9. On line 357 where it says "webserver-port:", replace the default port with the port number you copied earlier.
10. Save the file and restart your server.
11. To access your map, type in your search bar your server ip along with the port you assigned Dynmap. It should look something like this 192.96.215.161:49234
Mod Based Installation
(Forge/Fabric)
1. Download the version of Dynmap you want here.
2. Open your "Mods" folder in your server files.
3. Drop the mod into the "Mods" folder.
4. Restart your server.
5. Head over to the "Network" tab of your server panel
6. Click the "Create Allocation" button. This will assign a new port that will be used for Dynmap.
7. Copy the port number you were assigned. Do not use your primary port.
8. In your main server directory, a new folder should have generated called "Dynmap". Head in there and open up the "configuration.txt" file.
9. On line 350 where it says "webserver-port:", replace the default port with the port number you copied earlier.
10. Save the file and restart your server.
11. To access your map, type in your search bar your server ip along with the port you assigned Dynmap. It should look something like this 192.96.215.161:49234
Optional Database Installation
Dynmap stores the map as image files in your server by default. The file sizes may get very large especially for bigger servers. Setting up a database helps with file sizes and they don't count against your storage limits.
1. Navigate to the "Databases" tab of your server.
2. Click on "New Database" and give it a name of your choosing.
3. Copy the information that is marked in red boxes. This will be different from your database.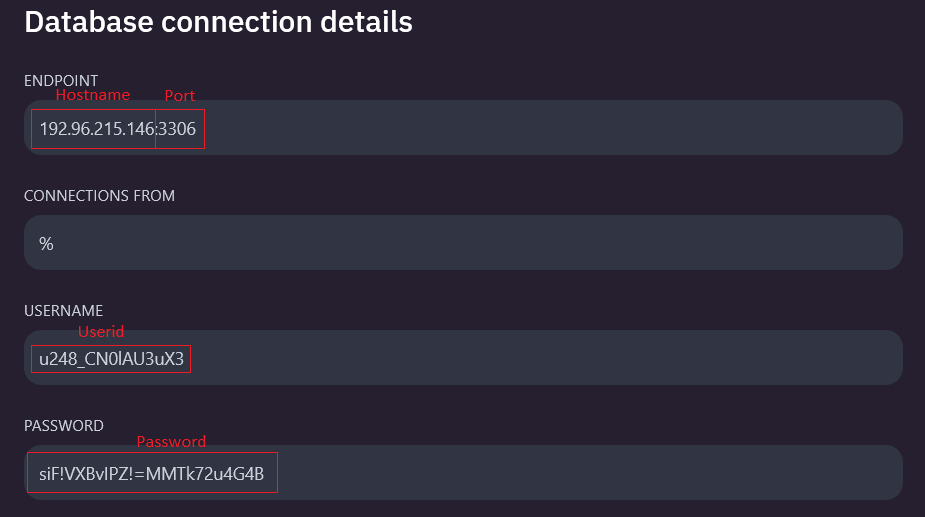
4. Head over to "configuration.txt" in your dynmap folder.
5. On line 35, fill in your database information as so. Do not forget to remove the #s at the start of every line from 35 to 42

6. For Modded installations (Forge/Fabric) an additional mod is required to communicate with databases. You may download that mod here and install it on your server.
7. Save the file and restart your server.
This article contains links to websites not operated by Astral Services. Astral Services is not responsible for the content of any linked website that is not operated by Astral Services.
